
Set up compatible smart lights, plugs, or sensors, connect them to your home network, and make them respond to a simple schedule or trigger. This guide is for beginners with a smartphone and access to their home Wi-Fi. Allow 45-90 minutes, depending on how many devices you add and whether you need to update their software.

Get the little things that make your day delivered free with Prime
- Fast, free delivery on millions of items
- Prime Video, Amazon Music and more included
- Member-only deals all year

Amazon Echo Hub 8-inch Smart Home Control Panel
- ✔ Display: 8-inch touchscreen, 1280 × 800 resolution
- ✔ Connectivity: Dual-band Wi-Fi, Bluetooth, Zigbee, Thread, Matter, Amazon Sidewalk
- ✔ Audio: Two top-ported full-range speakers with stereo playback
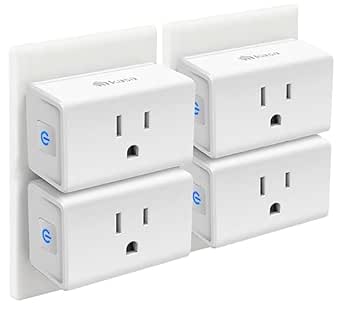
Kasa Smart Plug Mini EP10P4, 15A, 4-Pack
- ✔ Model and pack: EP10P4, four plugs
- ✔ Maximum current: 15 A
- ✔ Maximum wattage: 1800 W at 120 V

Kasa Smart Plug HS103P4, 4-Pack, Wi-Fi Outlet, Works with Alexa and Google Home
- ✔ Model and pack: HS103P4, four plugs
- ✔ Operating voltage: 120 V AC
- ✔ Maximum wattage: 1800 W
Difficulty: Beginner | Time: 45-90 minutes
What You’ll Need
Tools & Materials:
- A smartphone or tablet
- The device manufacturer’s app, downloaded from the official app store
- A working Wi-Fi router and its network name and password
- Smart home devices and any required batteries, bulbs, or power adapters
- A compatible smart home hub, if required by the devices
Knowledge:
- Basic ability to install an app and follow its setup prompts
- Access to the home Wi-Fi network and router settings, if needed
- A clear idea of the action you want to automate, such as switching on a lamp at sunset
Check each device’s packaging or product page for supported Wi-Fi bands, hubs, phone requirements, and regional compatibility. Many devices require 2.4 GHz Wi-Fi; some routers combine 2.4 GHz and 5 GHz under one network name. Keep your Wi-Fi password private and use a strong, unique password for the device account.
Amazon Echo Hub 8-inch Smart Home Control Panel
When we want one place to manage compatible devices, the Echo Hub offers a more complete automation role than either Kasa plug pack. Its 8-inch touchscreen presents controls for devices, cameras, routines, security systems, and media, while the customizable dashboard lets us organize and resize controls around our needs. Support for Zigbee, Thread, and Matter adds options for compatible devices that a Wi-Fi-only plug cannot provide on its own.That breadth comes with a more involved setup and a fixed location. The Hub needs an internet connection for setup and is designed for wall mounting or use with a separately sold stand, so it does not serve as a portable controller. Some installation extras, including cable pass-through and a PoE converter, are also separate. Compared with the EP10P4 or HS103P4, it makes the most sense when we already have, or plan to build, a mix of smart devices; for scheduling a few lamps, either plug pack is simpler.
Pros:
- Customizable touchscreen dashboard with rearrangeable and resizable controls.
- Built-in support for Wi-Fi, Bluetooth, Zigbee, Thread, and Matter devices.
- Wall mount and power adapter are included.
- Mic-off button and multiple privacy controls.
Cons:
- Internet access is required for setup.
- Not intended for handheld or portable use.
- Tabletop stand, cable pass-through, and PoE converter are sold separately.
Best for: Households building a mixed smart home that want a dedicated touchscreen for compatible devices, cameras, and routines.
Not ideal for: Buyers who only need to automate a few appliances, want a handheld controller, or do not want a fixed installation.
Bottom line: We recommend the Echo Hub when a central touchscreen and broad compatible-device support matter more than a minimal setup.
“We recommend the Echo Hub when a central touchscreen and broad compatible-device support matter more than a minimal setup.”
Kasa Smart Plug Mini EP10P4, 15A, 4-Pack
For outlet-based automation, the Kasa EP10P4 brings four compact plugs that are designed to leave the second outlet available on a standard wall socket. That space-conscious shape gives it an edge over plugs whose bodies can crowd a neighboring receptacle. We can control connected lights and small appliances through the Kasa or Tapo app, use compatible voice assistants, and set schedules, timers, or Away Mode.Like the HS103P4, this is a no-hub option for buyers whose routines center on plugged-in devices rather than a broader home dashboard. Its stated maximum is 15 A and 1800 W at 120 V, but we still need to check that an appliance is suitable for smart plug control. The main compromise is the dependence on 2.4 GHz Wi-Fi and the Kasa or Tapo app for setup and app control. Choose the HS103P4 if you prefer its straightforward feature set; choose the Echo Hub if you need to manage several compatible device types from a screen.
Pros:
- Compact body is designed to leave the second outlet available on a standard socket.
- Supports app and voice control, schedules, timers, and Away Mode.
- Four plugs are included, with no hub required.
- UL-certified and made with flame-retardant materials.
Cons:
- Requires a 2.4 GHz Wi-Fi connection.
- Kasa or Tapo app is required for setup and app control.
Best for: People automating several lamps or small appliances who need compact plugs that preserve access to adjacent outlets.
Not ideal for: Anyone seeking a central touchscreen, hub-based system, or smart plug that works without 2.4 GHz Wi-Fi and its companion app.
Bottom line: We’d choose the EP10P4 over the HS103P4 when compact outlet access and Away Mode are the deciding details.
“We’d choose the EP10P4 over the HS103P4 when compact outlet access and Away Mode are the deciding details.”
Kasa Smart Plug HS103P4, 4-Pack, Wi-Fi Outlet, Works with Alexa and Google Home
The Kasa HS103P4 is a direct route into smart home automation when our goal is to schedule ordinary appliances rather than coordinate a whole home. Four plugs connect over 2.4 GHz Wi-Fi, with control through the Kasa app or voice using Alexa and Google Assistant. Timers and schedules can automate recurring tasks without a separate hub, making this pack a practical fit for lights, fans, and other compatible appliances.Its simplicity is also its boundary. Unlike the Echo Hub, the HS103P4 offers no touchscreen or stated support for Zigbee, Thread, or Matter; it controls only devices connected to its outlets. And compared with the compact EP10P4, the supplied information does not highlight a space-saving design or Away Mode. We should also account for the 2.4 GHz network requirement and app operating-system requirements before choosing it. For basic outlet routines, it is the least complicated pick here; for broader automation or preserving a neighboring outlet, another option fits better.
Pros:
- Four plugs provide a simple way to automate multiple appliances.
- No hub is required.
- Supports app control, Alexa, Google Assistant, schedules, and countdown timers.
- UL certified.
Cons:
- Requires a 2.4 GHz Wi-Fi connection.
- App compatibility requires Android 5.0 or later or iOS 10.0 or later.
Best for: Buyers who want four uncomplicated plugs for scheduled or voice-controlled lamps and compatible appliances.
Not ideal for: People who need a smart home hub, broad device coordination, compact outlet clearance, or a plug option with Away Mode specified.
Bottom line: We’d pick the HS103P4 for basic multi-appliance schedules when a central controller and compact-body features are unnecessary.
“We’d pick the HS103P4 for basic multi-appliance schedules when a central controller and compact-body features are unnecessary.”
As an Amazon Associate we earn from qualifying purchases.
Before You Start
Choose one small automation to build first, such as turning on a lamp at a set time. Confirm that the device is installed in a safe, suitable location. Do not exceed a smart plug’s rated load, and do not use it for appliances that must not be left unattended unless the manufacturer approves that use. Keep account recovery details available. If a device needs a hub, power and connect the hub before pairing the device.
Step-by-Step Instructions
Step 1: Choose a device and automation
Pick one device and define the result you want in a single sentence: for example, “Turn on the hallway light at 7 p.m.” Check the device instructions to confirm it supports the trigger you plan to use, such as a schedule, motion sensor, or voice assistant. Start with a low-risk device, such as a lamp or a plug powering a small light.
Tip:Automations that depend on location, sunrise, or sunset may need location access and a correct home address in the app.
Check: You can name the device and state its trigger and action before opening the setup flow.
Step 2: Install the device safely
Follow the manufacturer’s installation instructions. For a smart bulb, switch off the light before replacing the bulb, then restore power. For a smart plug, connect it directly to a suitable wall outlet and plug in the intended appliance. For a sensor, install its batteries and place it where it can detect the event you want, away from obstructions or heat sources that could affect readings.
Tip:Do not open electrical fixtures or alter wiring unless you are qualified and the product instructions call for it. Stop if a plug, cable, or outlet is damaged or unusually hot.
Check: The device has power, its indicator matches the setup instructions, and it is positioned for the intended use.
Step 3: Install the official app and sign in
Download the manufacturer’s app from your phone’s official app store. Open it, create an account or sign in, and grant only the permissions needed for setup and the features you intend to use. If the app asks to verify your email, complete that step before pairing.
Tip:Check the developer name before downloading. Avoid setup links from unsolicited messages.
Check: The app opens to your account and offers a way to add a device or home.
Step 4: Add the device to your home
In the app, choose the option to add a device, then select the matching product type or scan its setup code if prompted. Put the device in pairing mode by following its instructions; this may involve pressing a button or cycling power. Select your home Wi-Fi network and enter its password carefully. If the device uses a hub, pair it through the hub’s setup flow.
Tip:Keep the phone near the device and router during pairing. If your network has separate 2.4 GHz and 5 GHz names, choose the band the device supports.
Check: The app shows the device as connected or online and lets you control it manually.
Step 5: Name the device and assign its room
Give the device a short, recognizable name, such as “Hallway lamp,” and assign it to the correct room. Use names that distinguish devices from one another. If you use voice control, avoid names that sound alike or include several competing descriptions.
Tip:Room assignments help you find devices later and can make voice commands more reliable.
Check: The device appears in the intended room and responds when you switch it on or off in the app.
Step 6: Update software and check settings
Open the device’s settings and check for a firmware update. Keep the device powered and connected while an update runs; do not unplug it unless the app instructs you to. Review relevant settings, such as a sensor’s detection sensitivity or a plug’s power monitoring, and leave unfamiliar options at their defaults until you know what they do.
Tip:Updates can take several minutes. Wait for the app to report completion before changing network or power settings.
Check: The app reports that the device is up to date, or shows that no update is available.
Step 7: Create a basic automation
Open the app’s automation, routine, or schedule section and choose the option to create one. Select a trigger, such as a specific time or a sensor event, then select the device and action. Set any needed days, duration, or conditions. Give the automation a clear name and save it. For your first automation, use a simple schedule so you can confirm the device responds.
Tip:Check whether the app uses your phone’s time zone, the home’s time zone, or a location-based sunrise and sunset setting.
Check: The saved automation appears in the app with the correct trigger, device, action, and schedule.
Step 8: Test the automation and review access
Run the app’s test option if available. Otherwise, temporarily set the trigger to occur within a few minutes, wait for the action, and then restore the intended schedule. Confirm that the device changes state as expected. Review account sharing and connected services, remove access you do not recognize, and enable multifactor authentication if the service offers it.
Tip:For motion or contact sensors, trigger the sensor once while watching the app’s status so you can separate a sensor issue from an automation issue.
Check: The device performs the selected action at the test trigger, and the saved automation shows the schedule you actually want.
Common Mistakes to Avoid
- Pairing a device to a Wi-Fi band it does not support. — Check the device’s network requirements first. If pairing fails, use the supported band and follow the router or app instructions for temporarily separating network names.
- Using vague or duplicate device names. — Name each device by room and function, such as “Office desk lamp,” and keep names distinct.
- Plugging a high-power or unsuitable appliance into a smart plug. — Compare the appliance’s load with the plug’s rated limits and follow both manufacturers’ guidance. Avoid devices that need continuous power or must not be restarted remotely.
Troubleshooting
Problem: The app cannot find the device during setup.
Solution:
Confirm that the device has power and is in pairing mode. Move the phone closer, enable Bluetooth if the setup instructions require it, and retry. If it was previously paired, use the manufacturer’s reset procedure and start pairing again.
Problem: The device joins Wi-Fi but appears offline later.
Solution:
Check that the router has internet access and that the device is within reliable Wi-Fi range. Restart the device and router only as the manufacturers recommend. Reconnect the device if the Wi-Fi password or network name changed.
Problem: The device responds manually but the automation does not run.
Solution:
Check that the automation is enabled, its days and time are correct, and the selected device and action match. Review location, time zone, and app permission settings for sunrise, sunset, or location triggers. Test again with a trigger a few minutes away.
Problem: A sensor misses events or triggers too often.
Solution:
Check its battery and placement, then adjust sensitivity or detection zones if the app provides those controls. Keep it clear of obstructions and follow the recommended distance and mounting height in the product instructions.
What Success Looks Like
The device appears online in the app, has a clear name and room, and responds to manual control. The automation is enabled with the intended trigger and action, and a test run produces the expected result. You can find the device settings and know how to disable the automation if its behavior is unwanted.
Next Steps
Let the automation run through its next scheduled trigger and check the app’s activity history, if available. Add devices one at a time and test each before adding more conditions. Review shared users and connected services periodically, install updates when practical, and replace sensor batteries when the app reports low power. If wiring, electrical ratings, or repeated network failures are involved, consult the product support team or a qualified electrician.
Frequently Asked Questions
Do smart home devices need internet access?
Many use internet access for remote control, voice assistants, alerts, and cloud-based automations. Some local controls may still work without internet, depending on the device, hub, and app. Check the product specifications for offline behavior.
Can devices from different brands work together?
Sometimes. Check for shared standards or compatibility with the same smart home platform before buying. A device may pair with one app but lack support for a feature or automation in another platform.
Why does my smart bulb turn off when I use the wall switch?
The switch cuts power, so the bulb cannot receive app commands while it is off. Leave the switch on for app control, or use a compatible smart switch or button according to the bulb and switch instructions.
How do I stop an automation quickly?
Disable it in the app’s automation or routine list. If the device is behaving unexpectedly, use its manual control or disconnect power when safe, then check the trigger and action before enabling the automation again.