TL;DR
A closet can serve as a surprisingly effective vocal booth or workstation if you focus on placement, sealing leaks, and strategic acoustic treatment. Moving the rig into another room is the most effective fix, but if you must keep it in the closet, proper ventilation and targeted damping are key.
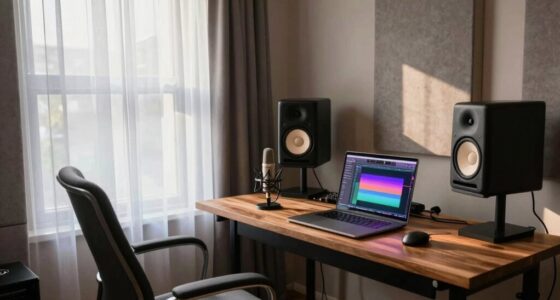
Ever tried recording vocals or working on a high-power rig in a tiny closet? Chances are, you’ve hit the wall of echo, boxiness, or noise leaks. But here’s the punch: your closet can actually be a perfect little studio—if you treat it right.
This isn’t about spending a fortune on permanent soundproof rooms. It’s about clever placement, smart dampening, and understanding what works best. You’ll learn how to tame reflections, seal leaks, and keep your gear cool—all while saving space and money. You can explore more about acoustic dampening and placement techniques.
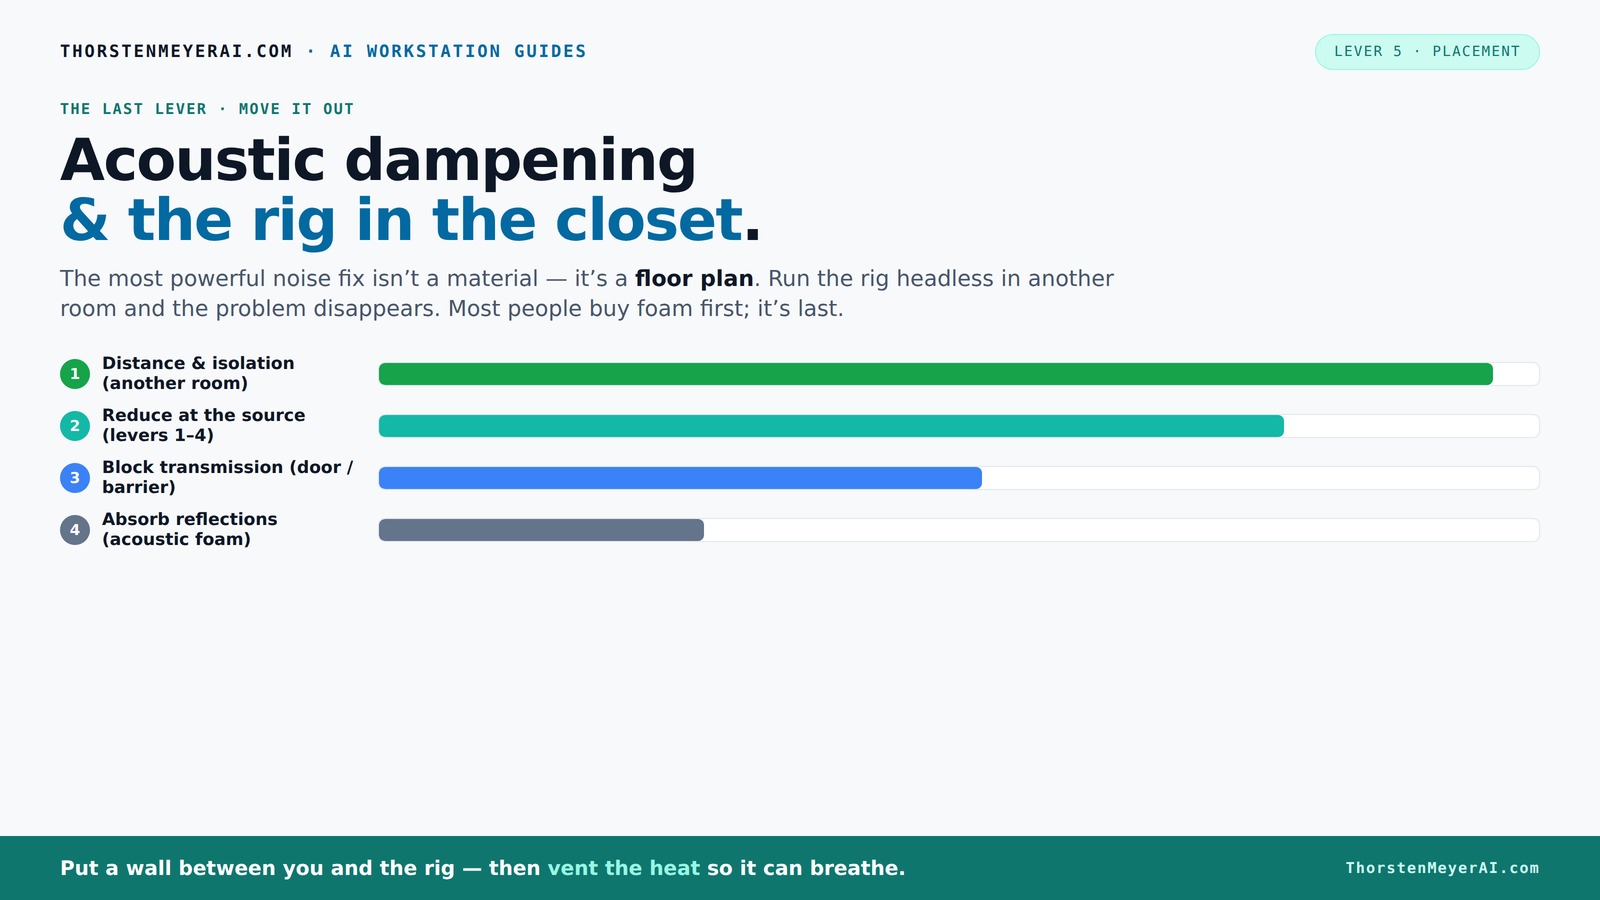
Acoustic dampening
& the rig in the closet.
The most powerful noise fix isn’t a material — it’s a floor plan. A rig you can’t hear because it’s in another room beats any amount of foam. Tap the approaches in Part 1 to see what actually works.
(another room)
(levers 1–4)
(door / barrier)
(acoustic foam)
Contain the noise, not the heat
Key Takeaways
- Moving the rig into another room or closet is the most effective noise reduction method.
- Proper ventilation is crucial when placing a high-heat machine in a closet; consider ducted fans or active airflow.
- In small spaces, focus on reflection points—door, ceiling, and walls near the mic—for the biggest acoustic improvements.
- Bass traps and thicker panels handle low-end buildup better in tiny rooms, preventing muddiness.
- Seal all gaps and leaks around the door and seams to prevent sound leaks, which foam alone cannot fix.

Focusound 52 Pack Acoustic Foam Panels 1" x 12" x 12" Sound Proof Foam Panles Soundproofing Noise Cancelling Wedge Panels for Home Office Recoding Studio with 300PCS Double-Side Adhesive
Soundproofing - Acoustic foam panels triangular grooves structure for better noise absorption, helps to reduce and absorb unwanted...
As an affiliate, we earn on qualifying purchases.
As an affiliate, we earn on qualifying purchases.
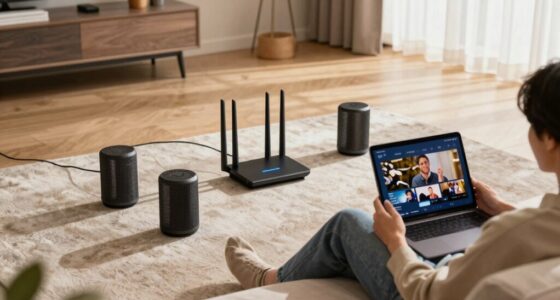
Why Moving Your Rig Is the Best First Step for Quiet Work
The simplest, most effective way to cut noise is to put distance between you and the source. A rig in another room, a closet, or a basement is quieter than anything you can achieve with foam or barriers.
If your goal is to record vocals or work without noise distraction, consider a wired connection to a remote machine. With a little network setup, your loud GPU or server can roar away in the closet while you sip coffee in silence at your desk.
This approach is especially perfect for AI work—your laptop or main computer doesn’t have to be near the noisy rig. Think of it like a secret weapon: silence and performance, all at once.

Aokeo Microphone Isolation Shield, Foldable Mic Shield with Triple Sound Insulation, Reflection Filter with 3/8" and 5/8" Mic Threaded Mount for Recording Studio, Podcasts, Singing, and Broadcasting
The Microphone Isolation Shield features a sound-proof foam front and a ventilated metal back panel to eliminate noise...
As an affiliate, we earn on qualifying purchases.
As an affiliate, we earn on qualifying purchases.
The 'Rig in the Closet' Setup: How to Keep It Cool and Quiet
Placing a hot, high-load machine in a closet sounds smart for noise—until heat becomes a problem. Without proper ventilation, your rig will cook itself, causing fans to spin faster and noise to spike.
To avoid this, you need active ventilation: intake and exhaust vents, or better yet, a quiet exhaust fan pulling hot air out. Many DIY setups use ducted fans, or even small inline fans, to keep temperatures stable.
Seal gaps around the door with weatherstripping or acoustic sealant. For serious silence, consider a purpose-built soundproof cabinet with temperature control, which balances noise reduction with cooling needs. Check out how these cabinets combine soundproofing with airflow management.

'Snap Studio' The Original Vocal Booth, Pro Sound Blankets, Portable Studio-Grade Recording, Sound Isolation, Trusted Globally By Professional Artists, Musicians, VO, Podcasters
#1 Recommended Portable Recording Booth — Featured by Rolling Stone Magazine as the “best sound booth”, Snap Studio’s...
As an affiliate, we earn on qualifying purchases.
As an affiliate, we earn on qualifying purchases.
Acoustic Dampening vs. Soundproofing: What’s the Difference?
Acoustic dampening reduces echo and reflections inside a space—making it sound less boxy. Soundproofing stops sound from leaking in or out, creating a barrier.
Understanding the difference is crucial because they serve different purposes. Dampening panels, foam, or diffusers inside a room help control how sound behaves within that space—reducing reverberation, making recordings clearer, and preventing the space from sounding 'echoey.' For more on how to optimize your space, see acoustic dampening and placement.
In a closet, dampening can make your recordings sound more natural and controlled by minimizing internal reflections. But if you want to prevent sound from escaping and disturbing others, you’ll need soundproofing measures—like sealing gaps and adding mass. You can learn more about effective soundproofing techniques.
portable soundproof room divider
As an affiliate, we earn on qualifying purchases.
As an affiliate, we earn on qualifying purchases.
Where to Place Acoustic Treatment in a Tiny Closet
In a small closet, where you place foam and panels makes all the difference. The most effective spots are: behind the microphone, directly in the sound path, and on the ceiling.
Think of sound bouncing off walls—these are reflection points. Covering the door, walls near the mic, and ceiling with absorption reduces echo and 'boxiness.' For detailed placement strategies, see acoustic treatment placement.
For example, a dense foam panel behind the mic can tame harsh reflections from the closet's back wall. Use broad dampening blankets or acoustic panels on the door and ceiling to soften the sound further.
By strategically placing treatment at these reflection points, you target the areas where sound naturally ricochets, which can otherwise cause muddiness and reduce clarity. Proper placement ensures you’re not wasting treatment on areas that contribute little to sound quality, maximizing effectiveness and saving costs.
Do You Need Bass Traps in a Small Closet?
Bass traps are essential if your closet walls are parallel and you notice low-frequency buildup—like a boominess in recordings. These traps absorb the deep, rumbling sounds that standard foam can’t handle. Find out more about bass trapping and low-end control.
A typical closet benefits from thick, 4-inch bass traps placed in the corners. This helps prevent standing waves and muddiness—making your vocals clearer and your mixes more balanced.
Low frequencies tend to build up in enclosed, symmetrical spaces because sound waves bounce back and forth, creating standing waves. Bass traps in the corners absorb these deep frequencies, preventing them from causing muddiness or boominess. Without them, recordings can sound boomy or uneven, especially if the room's dimensions reinforce certain low frequencies. Installing bass traps is a tradeoff—cost and space for clarity and balance, which is often worth it in small, reflective environments.
Budget DIY Closet Booths: How to Soundproof Without Breaking the Bank
You can turn a closet into a decent vocal booth with simple, low-cost materials. Think thick moving blankets, old mattresses, or thick foam panels—mounted with command strips or tape.
Seal gaps around the door with weatherstripping or draft stoppers. Use a reflection filter or a small foam panel behind the mic. Cover walls with blankets to reduce echo.
For example, a DIY setup with $50 worth of moving blankets and a few foam panels can cut reflection and leakage significantly, making your recordings much cleaner.
While budget options are effective for reducing reflections and sound leakage within the closet, they often come with tradeoffs—such as less effective soundproofing from external noise, or less durability over time. The key is to prioritize the most critical areas—door gaps, reflection points—and supplement with affordable materials. This approach allows you to improve sound quality without major investment.
Common Mistakes to Avoid in a Closet Studio
Don’t ignore gaps—sound leaks through tiny cracks around the door or seams. Seal them with weatherstripping or acoustic sealant.
Don’t over-treat corners with thick panels alone—focus on reflection points first. Too much absorption in the wrong spots can make your sound dull or boxy.
And avoid putting foam directly behind a mic without a reflection filter—direct reflections hurt clarity. Instead, position the mic where it’s least reflective, and add a portable reflection filter nearby.
Understanding these common pitfalls helps you create a more balanced and functional space. Over-treating or neglecting key areas can lead to sound that is muffled, dull, or still leaks noise, undermining your efforts to produce professional-quality recordings.
Ventilation and Power for a Closet Rig
Good ventilation keeps your rig cool and prevents overheating. For a closet setup, install a small, quiet exhaust fan, and make sure air can flow in and out.
Use ducting if necessary, and consider a thermostat-controlled fan for continuous operation. Also, plan your power access—use power strips and cable management to avoid clutter and fire hazards.
For example, a small inline fan drawing air through a vent keeps temperatures stable, prevents throttling, and reduces noise from overheating.
Proper ventilation not only protects your equipment but also maintains a comfortable environment, preventing heat buildup that can cause components to throttle or fail prematurely. Choosing quiet fans minimizes noise intrusion, ensuring your workspace remains peaceful during recordings or work sessions.
When a Closet Is Enough and When It’s Not
A closet can be a perfect, budget-friendly option for voice work or low-frequency monitoring if you treat reflection points and seal leaks. But for professional-quality sound, bigger rooms with dedicated treatments are better.
If you notice your recordings are muddy or your noise leaks, it might be time to upgrade to a dedicated studio or a purpose-built sound booth. For casual work or voiceovers, a well-treated closet does the job—especially if you prioritize quiet operation over absolute fidelity.
Frequently Asked Questions
Can a closet really work as a vocal booth?
Yes, a closet can serve as a decent vocal booth if it’s well-treated. Focus on reducing reflections with foam or blankets, sealing gaps, and adding bass traps if needed. Proper mic placement and reflection filters also help improve clarity.
What is the difference between acoustic dampening, acoustic treatment, and soundproofing?
Acoustic dampening reduces echo and reflections inside a space, making it sound less boxy. Acoustic treatment involves adding panels or foam to control reflections. Soundproofing prevents sound from entering or leaving the room, sealing leaks and adding mass for isolation.
Where should I place foam or panels in a closet studio?
Place foam panels behind and around the microphone, on the ceiling, and on the door. Focus on reflection points where sound bounces off hard surfaces. Use bass traps in corners if low-end boominess is an issue.
Do I need bass traps in a closet?
Yes, especially if you notice low-frequency buildup or booming sounds in recordings. Thick bass traps in corners can absorb deep frequencies, resulting in clearer vocals and more balanced mixes.
How do I stop sound from leaking through the closet door gaps?
Seal gaps with weatherstripping or acoustic sealant. Use draft stoppers or acoustic curtains around the door. These small fixes dramatically cut down on sound leaks that foam alone can’t block.
Conclusion
Your closet can be a surprisingly good acoustic space—if you treat it smartly. Moving the noise source away is the most powerful step, but if that’s not possible, focus on ventilation, sealing gaps, and targeted dampening.
Remember, the best sound setup is the one that balances quiet, cool, and clarity. Think of your closet as a blank canvas—add the right treatments, and it becomes a mini studio that works for your space and budget.